Lesson Plan Title: 8-Bit Art
Date: Oct. 17th, 2017
Subject: Graphic Arts
Grade: 11
Topic: 8-Bit Illustration Art
Essential Question: How to create 8-Bit graphic art?
Materials: Desktop computers, PowerPoint, Adobe Illustrator, projector, internet access, scanner, paper, pencils/pens
What do they need to understand, know, and/or able to do?
They need to understand how to use specific tools in illustrator such as grouping/un-grouping, unite, snap to grid (major and minor grid), pathfinder, rectangle, eyedropper, and layers.They will also need to know how to use tools and basic concepts in illustrator from previous lessons in the semester.
Broad Areas of Learning:
The broad areas of learning are that the students will learn about the history of 8-Bit art and where it came from.It will bring a sense of nostalgia for them and give them an understanding of how older video games were made.Students will think about how to convert a hand drawn image with curves that is representational of a mode of transportation into a geometric cube style (this will require problem solving skills).Students will work on their drawing and art skills by sketching out their initial images and coming up with a concept design for their project.
Cross-Curricular Competencies:
The other curriculum that this assignment falls under is the visual art curriculum. This assignment incorporates drawing skills as well as colour theory (choosing colour related to each other) used for the shadows, midtones, and highlights.
Outcome(s):
Module 1- Introduction to graphic arts
Outcome: Demonstrate an understanding of graphic arts through investigating the history, the present, and potential innovations in the future
Module 3A- Layout
Outcome: Demonstrate a basic understanding of layout as an effective aspect of visual communication.
Outcome: Demonstrate a basic understanding of layout as an effective aspect of visual communication.
PGP Goals:
1.2 ethical behaviour and the ability to work in a collaborative manner for the good of all learners;
2.2 proficiency in the Language of Instruction;
2.4 ability to use technologies readily, strategically and appropriately
Assessment FOR Learning (formative) Assess the students during the learning to help determine next steps.
I will assess the students during the demonstration to see if they are following along and keeping the same pace as everyone else. I will watch to see if they are paying attention and following the steps correctly or if they are skipping steps.This will help me to determine if I need to speed up the demo or slow down the demo to fit the needs of the students.It will help me to understand what level the students are at and help me to plan the following days lessons.
Assessment OF Learning (summative) Assess the students after learning to evaluate what they have learned.
This will be an evaluation of the student’s final project along with the in-progress work (initial hand drawings and practice illustrations) that they are required to complete. I will be looking for the specific steps that the students needed to follow to complete the assignment: scanned image, grid-to-snap function (aligned with scanned grid), colour pallet (five assorted colours used), individual layers used for each colour, unite tool (colours united together), rectangle tool (used to make squares).The final criteria I will evaluate on is the overall impression of the illustration and its esthetic value.
Motivational/Anticipatory Set (introducing topic while engaging the students)
I will introduce the lesson by going through a short PowerPoint and talking about some ways in which 8-Bit art has been used in the past.I will show some images of video games that use 8-Bit art and have a conversation with the students to see if they recognize any of the games.I will also show some modern images of 8-Bit art like Nyan Cat and talk about why we still use 8-Bit art today.
Main Procedures/Strategies:
The main procedure for this lesson will be to teach it from the computer and projector at the front of the classroom.I will have the demo built in different steps so that I am able to show the students how to use a tool and then get them to finish the next steps while I walk around the room to make sure no one is falling behind.I will continue to repeat this method of teaching until the demo is complete and all the students have finished the illustration.With regards to the demo the steps are as follows. The students will have a prebuilt Illustrator file (hand drawn whale on grid paper) on canvas which they will access and open into Illustrator.The students will reduce the opacity of the image then go to view-show grid then view-snap-to-grid. A digital grid will appear, and the students will align the hand drawn grid with the digital grid. To do this they will take the rectangle tool and create a square on one of the hand drawn grid boxes they will click transform and the measurement of the square will appear.Then they will go to edit-preferences-guides and grids, they will adjust the subdivisions to one and adjust the “gridline every” to the number from the square (roughly 2.54cm).They will then drag the grid into the position that it needs to be, so it is lined up as close as possible. At this point they need to create a new layer (lock the previous layer) and label it appropriately (based on which area they are starting with Ex. outline, shadows, midtones, highlights, and white).Students will then take the rectangle tool and draw/colour in the areas related to that layer, then use the eyedropper tool to click on the appropriate colour in the colour pallet and click the selected area.Next, go to window-pathfinder (making sure there is a checkmark beside it) and turn it on. Using the direct selection tool (making sure all other layers are locked) click and highlight all the boxes that they just made (the same colour boxes) and go to pathfinder-shape modes-unite. This unites all the same coloured boxes together.Repeat these steps from creating a new layer for each of the other layers shadows, midtones, highlights, and white until the whale is complete.
Adaptations/Differentiation:
I will differentiate this lesson by either slowing down the demo or speeding up the demo based on the needs of the students. I will go over other tools briefly if students need a reminder of how to use something else before or during the demo. I will go and help students one on one as I float around the classroom if they need extra support.
Closing of lesson:
To close the lesson, I will talk with the students about the expectations of their assignment, the rubric, how many days they must work on it, and when it is due.The last 15-20 minutes I will leave open, so the students can start working on their project and get some feedback or help if they need.
Personal Reflection:
I think the lesson went quite well, the students seemed to be engaged and interested in the topic of 8-Bit art.The illustrations that they created from the project were interesting and engaging for me to look at, many of the students put a lot of effort into their design and creation.

Lesson Plan: Typography -Using text on
illustrator
Date: December 6th, 2017
Subject: Graphic Arts
Grade: 11
Topic: Typography
Essential Question: How to use text in illustrator
Materials: Desktop computers, adobe illustrator, projector, internet access, image of an animal
What do they need to understand, know, and/or able to do?
The students need to be able to use the basic tools of illustrator taught to them in previous classes this semester. Students must be able to understand the computers that they are working with and enough background with the program (illustrator) layout to work efficiently and follow along during the demo (using shortcut keys and knowing where tools are located).
Broad Areas of Learning:
The broad areas of learning for this lesson are related to the English curriculum along with reading and writing literacy skills.Students will learn about assorted styles and fonts of texts as well as learning about the character properties of text. This will hopefully make students more aware of the impact that text has on our world and how detailed text can really be.Students will gain a worldlier understanding of text.
Cross-Curricular Competencies:
Students will learn about English as they understand more about text and why it is so important, they will hopefully gain an understanding of the endless modifications that can be made to text.Visual art will also be a part of this lesson plan, students will take a visual image and add text to it combining two different forms of representation. Computer skills and abilities are also included because the students must work on a computer.
Outcome(s):
Module 1- Introduction to Graphic Arts
Outcome: Demonstrate an understanding of graphic arts through investigating the history, the present, and potential innovations in the future.
Module 3A- Layout
Outcome: Demonstrate a basic understanding of layout as an effective aspect of visual communication.
Module 4A- Typography
Outcome: Utilize selected typography to communicate a message effectively.
PGP Goals:
1.2 ethical behaviour and the ability to work in a collaborative manner for the good of all learners;
2.2 proficiency in the Language of Instruction;
2.4 ability to use technologies readily, strategically and appropriately
2.5 knowledge of a number of subjects taught in Saskatchewan schools (disciplinary/interdisciplinary knowledge)
Assessment FOR Learning (formative) Assess the students during the learning to help determine next steps.
During the lesson I will be assessing the students on their ability to use illustrator effectively and efficiently as they follow along. Are they able to keep up to the general pace of the group, are they way ahead of everyone, or are they behind? I will leave my computer as much as I can to go and individually check student’s screens and make sure they are on task and understanding.Other areas of assessment will be in terms of their ability to follow instructions and direct instructions, have they followed each step correctly?
Assessment OF Learning (summative) Assess the students after learning to evaluate what they have learned.
This form of assessment will come from me looking at the student’s final products to see if they have followed the steps correctly and produced a well thought out and interesting illustration.There are many technical factors that will be evaluated such as, which tools the students used and in what order they used them, how they organized their layers and image, the distortion of the text and its readability, colour choices, choice of font, and image choice (to easy/to hard).The final form of evaluation for this assessment is the esthetic quality and overall impression of the illustration.
Motivational/Anticipatory Set (introducing topic while engaging the students)
Topic was introduced with a video the day prior to my lesson because the unit of Typography is quite large. I briefly went over the concept of typography and showed some interesting images of different type face in books and on the projector screen before starting the initial demo.
Main Procedures/Strategies:
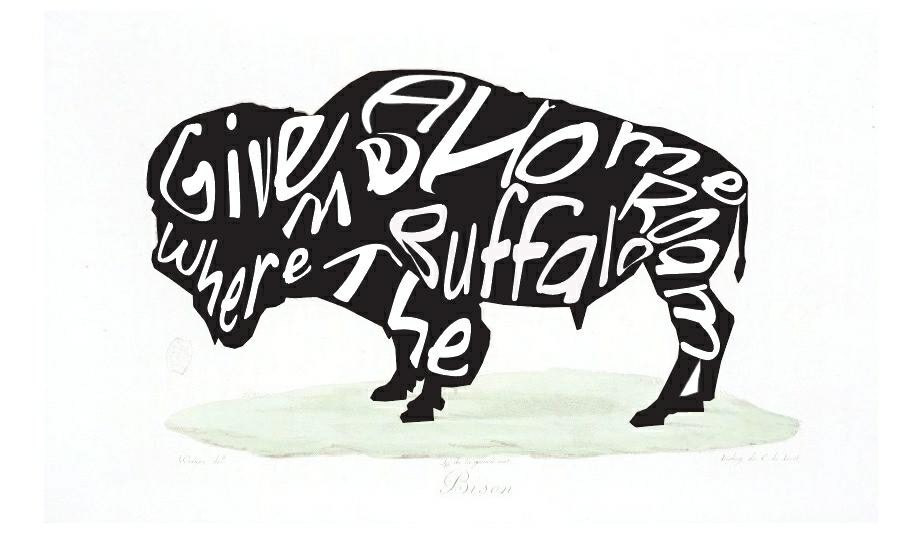
The main procedure for this lesson is to use the computers and projector to teach a demo to the students using a specific set of tools on illustrator related to text and referencing typography. The first mini demo that the students will follow along with is modifying character properties. They will open the pre-made illustrator file on canvas and start to follow along as I lead them through a grid layout with fifteen examples of the distinctive character property tools.I will then explain what the tool does and why we use it, the student will try it on their layout to make it match my sample and we will move on to the next one. After this is complete we will move onto the project demo where they will learn about more tools relating to text on illustrator.The project incorporates visual imagery that the students will create themselves built off another image (from google images) then they will overlay text on top fitting it into the image. For the purposes of the demo I have given the students an image that we will be working with.They start first by using the pen tool and outlining the bison, then they will fill the animal in with black and get rid of the stroke so there is no border. Next, they will select a text MV Boli for the demo and set the font size to 72 (font will get bigger and smaller during distortion step).Set the font colour to white (because our bison is black), type out the first word of the song lyrics that were chosen (Give me a home where the buffalo roam) one word per textbox and drag each word onto the bison (roughly). Select the first word and go to object-envelope distort-make with mesh, turn on the preview in the little box that pops up, then select 1 row and 3-7 columns (this is based on how many letters the word has).Click okay and begin to distort the word (while still making it fit inside the animal) by pulling at the joints around the outside of the text box.Repeat this step until all the words have an envelope mesh around them and have been distorted into the shape of the animal.
Adaptations/Differentiation:
The adaptations I would add to this assignment would be to assess if the students (or maybe just a few) need me to slow down during the demo and repeat steps.I also might need to speed up the demo and work more quickly if the students feel I am going too slow.Students who require one on one help will be able to receive that as I float around the classroom checking on people. I will also give students more time to finish and ask questions at the end of the demo.
Closing of lesson:
To close the lesson, I will introduce the project to the students and talk about the rubric, when it is due, and how much in class time they must work on it.The students will then be free to spend the remaining 10-15 minutes starting their project, asking questions, finishing the demo, or getting help.
Personal Reflection:
I think the demo went well, the students seemed to be engaged and interested in learning how to make this illustration.They really enjoyed learning how to use the envelope mesh distort tool and some students have continued to use it since.Typography is a difficult unit to teach students because they don’t seem to grasp the huge importance of type and they really didn’t want to learn the history behind it which was disappointing, but we have continued to work with it and I think they may be coming around.